

This pear danish recipe is a delicious way to celebrate the natural sweetness of fresh pears. Featuring tender stewed pears wrapped in flaky puff pastry and finished with a sweet drizzle, each pear danish is a bakery-style treat you can enjoy at home. Whether you’re looking for a homemade fruit danish to serve at brunch, afternoon tea, or as a special dessert, this pear danish brings a perfect balance of buttery, golden pastry and juicy fruit. Follow the full pear danish recipe below for a beautiful and satisfying bake.

Pear Danish Ingredients
Simple pantry staples meet fresh, juicy pears in this Pear Danish recipe.
- Pears
- White sugar (optional)
- Puff pastry
- Golden syrup (optional)
- Icing sugar
- Condensed milk
See recipe card for quantities.
Equipment
To make this recipe you will need.
- Small pot
- Spoon
- Knife
- Oven tray
- Baking paper
- Oven
- Cooling rack
- Chopping board
- Small bowl
- Pastry brush
Instructions
Step by step instructions to make this pear danish recipe.

Step 1: Prep the Pears: Peel the pears and chop them into small cubes. Place in a small saucepan over low heat and cook gently, stirring occasionally, until softened. Remove from heat and set aside to cool. If adding sugar place in saucepan at the same time as the pears.

Step 2: Prepare the Pastry: Lay out a sheet of puff pastry and cut it into six even rectangles.

Step 3: Assemble the Danishes: On half of the pastry rectangles, brush the edges lightly with water. Spoon about two tablespoons of the stewed pear mixture into the centre of each. Add a drizzle of golden syrup over the pears for a little extra sweetness, if desired.

Step 4: Create the Lattice Tops:
Take the remaining pastry rectangles and make 3–4 small slits in each one by running a knife from about 1 cm in from one edge to 1 cm in from the other. This helps create a lovely, vented top.

Step 5: Seal the Danishes:
Carefully place the slit pastry rectangles over the filled ones. Press around the edges to seal, using your fingers or a fork.

Step 6: Repeat: Repeat steps 2–5 with additional sheets of pastry as needed.

Step 7: Bake: Bake at 180°C (fan forced) for 15–20 minutes, or until the pastries are puffed up and golden brown. Remove from the oven and allow to cool on a wire rack.

Step 8: Make the Icing Drizzle:
In a small bowl, mix together 4 tablespoons of icing sugar with 2 tablespoons of condensed milk. Stir until thickened and smooth — add more icing sugar if needed to reach drizzling consistency.
Step 9: Finish and Serve:
Once the Danishes have cooled, drizzle with the icing and enjoy!
Storage
Storage Instructions:
Store your pear danishes in an airtight container in the fridge for up to 5 days. Make sure they are completely cooled before storing to help keep the pastry crisp.
To reheat, simply warm them in a low oven (around 150°C / 300°F) for 5–8 minutes until refreshed.
Freezing:
Pear danishes can also be frozen. Once cooled, place them in a single layer in an airtight container or freezer bag. Freeze for up to 2 months.
To serve, thaw at room temperature and reheat in a low oven to bring back their flaky texture.
Pear Danish Recipe
Print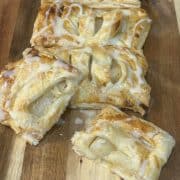
Pear Danish
- Total Time: 50 minutes
- Yield: 12 danishes 1x
Ingredients
6 – 8 large pears
1 tablespoon sugar (optional)
4 sheets puff pastry
Golden syrup, for drizzling (optional)
4 Tablespoons icing sugar
200g condensed milk
Instructions
1. Prep the Pears: Peel the pears and chop them into small cubes. Place in a small saucepan over low heat and cook gently, stirring occasionally, until softened. Remove from heat and set aside to cool. If adding sugar place in saucepan at the same time as the pears.
2. Prepare the Pastry: Lay out a sheet of puff pastry and cut it into six even rectangles.
3. Assemble the Danishes: On half of the pastry rectangles, brush the edges lightly with water. Spoon about two tablespoons of the stewed pear mixture into the centre of each. Add a drizzle of golden syrup over the pears for a little extra sweetness, if desired.
4. Create the Lattice Tops: Take the remaining pastry rectangles and make 3–4 small slits in each one by running a knife from about 1 cm in from one edge to 1 cm in from the other. This helps create a lovely, vented top.
5. Seal the Danishes: Carefully place the slit pastry rectangles over the filled ones. Press around the edges to seal, using your fingers or a fork.
6. Repeat: Repeat steps 2–5 with additional sheets of pastry as needed.
7. Bake: Bake at 180°C (fan forced) for 15–20 minutes, or until the pastries are puffed up and golden brown. Remove from the oven and allow to cool on a wire rack.
8. Make the Icing Drizzle: In a small bowl, mix together 4 tablespoons of icing sugar with 2 tablespoons of condensed milk. Stir until thickened and smooth — add more icing sugar if needed to reach drizzling consistency.
9. Finish and Serve: Once the Danishes have cooled, drizzle with the icing and enjoy!
- Prep Time: 15
- Cook Time: 35
Looking for other recipes?
Try these:

Comments
No Comments